To provide you with better email experience, we are transferring your emails to our advanced email hosting platform.
If your account is one of the migrated accounts, read the following instructions to make sure your domain is connected to the new email platform correctly.
Before you start, check the current name servers of your domain, then check the table below for the appropriate steps.
NOTE : You can do a WHOis search to know your domain's name servers.
Update the DNS in Account Manager
- Go to the DNS settings in the Account Manager.
- Add or replace the MX Records of the main domain with the following values:
| Sub Domain |
Priority |
Assign To Server |
| (Leave it empty) |
1 |
mx001.crazydomains.xion.oxcs.net |
| (Leave it empty) |
5 |
mx002.crazydomains.xion.oxcs.net |
- Add or replace the CNAME Record of the mail host with the following values:
| Sub Domain |
Alias For |
| mail |
pop.premium.crazydomains.com |
- Wait for the changes to fully work or resolve.
Update the DNS in cPanel or Linux Hosting Manager
- Go to the cPanel DNS editor.
- Add or replace the MX Records of the main domain with the following values:
| Name |
TTL |
Type |
Record |
| (yourdomain) |
14400 |
MX |
Priority: 1
Destination: mx001.crazydomains.xion.oxcs.net |
| (yourdomain) |
14400 |
MX |
Priority: 5
Destination: mx002.crazydomains.xion.oxcs.net |
- Add or replace the CNAME Record of the mail host with the following values:
| Name |
TTL |
Type |
Record |
| mail |
14400 |
CNAME |
pop.premium.crazydomains.com |
- Wait for the changes to fully work or resolve.
Update the DNS in Plesk or Windows Hosting Manager
- Go to the Plesk DNS settings.
- Add or replace the MX Records of the main domain with the following values:
| Record |
Mail domain |
TTL |
Mail exchanger server |
Priority |
| MX |
(Leave it empty) |
(Leave it empty) |
mx001.crazydomains.xion.oxcs.net |
1 |
| MX |
(Leave it empty) |
(Leave it empty) |
mx002.crazydomains.xion.oxcs.net |
5 |
- Add or replace the CNAME Record of the mail host with the following values:
| Record type |
Domain name |
TTL |
Canonical name |
| CNAME |
(Leave it empty) |
(Leave it empty) |
pop.premium.crazydomains.com |
- Wait for the changes to fully work or resolve.
Update the DNS Through External DNS Provider
If your domain name is connected to external name servers (not ours), contact the provider and request them to update the DNS of your domain to the following DNS records:
MX RECORDS
| Host |
Record Type |
Priority |
Points to |
| (yourdomain) |
MX |
1 |
mx001.crazydomains.xion.oxcs.net |
| (yourdomain) |
MX |
5 |
mx002.crazydomains.xion.oxcs.net |
CNAME RECORD
| Host |
Record Type |
Alias for |
| mail.(yourdomain) |
CNAME |
pop.premium.crazydomains.com |
IMPORTANT : Changes to the Name Servers and DNS records will take two to four hours to fully work on the internet. However, some ISPs have their TTL duration that could override our maximum DNS resolution time. It may cause the changes to take up to 24-48 hours to fully work.
Our Email Hosting is now on a new and better mailing platform. You might ask, why the change and how will this benefit you?
You get to enjoy more advanced Email Hosting features which cPanel does not provide. Plus, it has all-around features that doesn’t limit you from communicating professionally through email within your organisation.
The purpose of this article is to help you understand which DNS Records need to be checked, and where to configure them, especially if your domain is hosted in another provider while using Crazy Domains Email Hosting.
Also, this serves as a general checklist if you have your Domain Name and Email Hosting registered with us.
Note: This new mailing platform only allows you to setup four Email Forwarders. For further information about this, please contact our support team.
So, let’s get started!
First thing you need to check are your DNS Records: these records make sure that all incoming and outgoing information - including emails - are pointing back to your domain name. So, if you’re ready to learn where and how to configure these records, click on the following links below to jump directly to the corresponding section of this article:
How to Check Name Servers
Refer to the article below and use it as a guide on how to add or configure your Name Servers to be used for your mail:
You can update your DNS Records, mainly MX Records and CNAME Records, through:
Important: Changes to these records are applied immediately but may take up to 2 hours to propagate across the internet. If you have added new records and have seen no change, please wait for this propagation period to finish. Otherwise, contact us for assistance.
If via Account Manager
Create MX Records via Account Manager
| Step 1. |
Access your Account Manager. |
| Step 2. |
Click Domains on the menu bar at the top of the page. |
| Step 3. |
Click the Domain Name that you wish to manage.
If you only have one domain, you will automatically be redirected to its management page.
|
| Step 4. |
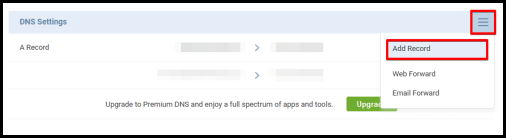
Scroll down to the DNS Settings section and click the Hamburger Menu icon on the right, then select Add Record.
(Or to update an existing record: hover your cursor over the MX Record and click the Modify option that appears on its right.)
|
|
|
| Step 5. |
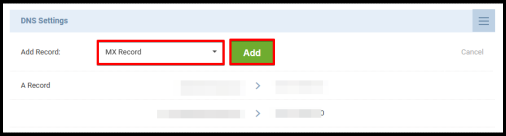
Select MX Record from the drop-down menu, then click the Add button. |
|
|
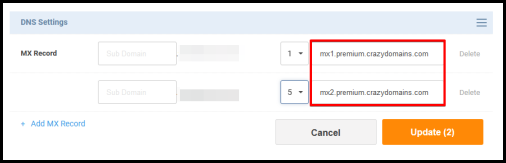
| Step 6. |
Set the Priority number (lower numbers mean higher priority), and enter these followings MX Records in the Assigned To Server field:
- mx1.premium.crazydomains.com
- mx2.premium.crazydomains.com
|
|
|
| Step 7. |
Then, click the Update button. |
Once added, you need to create a CNAME Record. Here’s how.
Create CNAME Record via Account Manager
Access to your DNS Settings section using the same steps mentioned above, and follow the steps below to add your CNAME Record:
| Step 1. |
On the DNS Settings section, click the Hamburger Menu icon on the right, then select Add Record. |
| Step 2. |
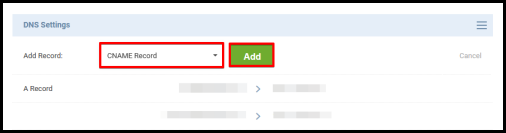
Select CNAME Record from the drop-down menu, then click the Add button. |
|
|
| Step 3. |
Enter pop.premium.crazydomains.com in the Alias For field. |
|
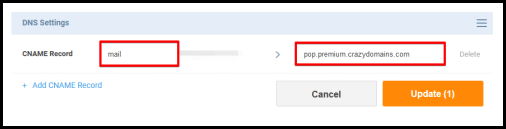
|
| Step 4. |
Then click the Update button. |
If via Hosting Manager
Create MX Records via Hosting Manager
To update your MX record via Hosting Manager, follow the instructions below:
| Step 1. |
Access your Hosting Manager. |
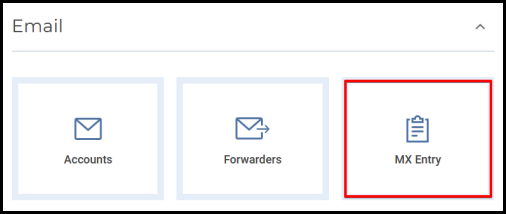
| Step 2. |
Click on Email tab and select MX Entry option. |
|
|
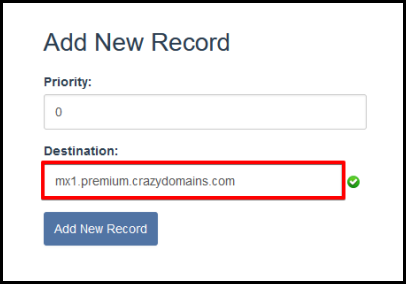
| Step 3. |
Select the Domain Name you wish to manage from the drop-down list.
If you only have one domain name, simply scroll down to:
Add New Record section and add the following information:
- mx1.premium.crazydomains.com
- mx2.premium.crazydomains.com
|
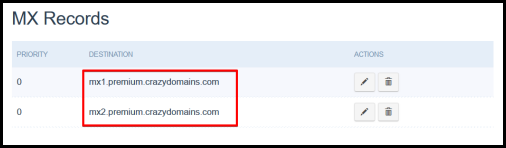
| Step 4. |
Then click, the Add New Record button. Your added MX Records will appear under MX Records section. |
|
|
Create CNAME Records via Hosting Manager
To add your CNAME Record via Hosting Manager, simply follow the steps below:
| Step 1. |
Access your Hosting Manager. |
| Step 2. |
From the Home page, click on the Domains or the [ v ] arrow symbol on the right side, then click the Advanced Zone Editor icon. |
| Step 3. |
Select the domain name you wish to manage from the drop-down list. Or if you only have one domain, scroll down to the Add a Record section.
|
| Step 4. |
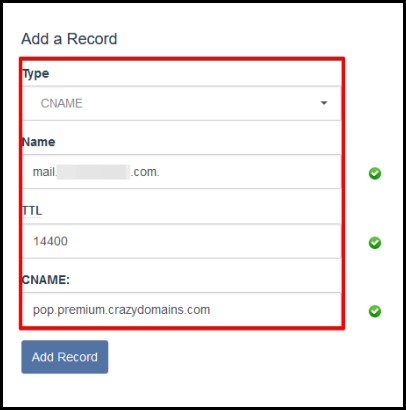
Enter the following information to:
- Type – CNAME
- Name – mail.yourdomain.com (replace yourdomain.com to your registered domain name)
- TTL – 14400
- CNAME – pop.premium.crazydomains.com/185.74.65.251
|
|
|
| Step 5. |
Click the Add Record button. |
Once you have ensured that all of these records have been configured with the correct data, your emails should work properly.
You can try sending a test email to your domain email address to make sure everything’s all set. If you encounter problems or have any questions about the steps in this guide, please don’t hesitate to contact our technical support team for further assistance.
Fantastic...Thank you for your feedback =)
Sorry... Please submit a support ticket or try another search.